-
The whole process of photovoltaic panel line installation
This guide walks you through every step of the installation process. Pre-Installation Planning 2. . Timeline Reality: The complete solar installation process typically takes 60-120 days from consultation to activation, with permitting being the longest phase (30-45 days) rather than the actual installation (1-3 days). 2025 Financial Landscape: While the federal ITC remains at 30% through 2032. . In this guide, we will take you through a detailed step-by-step process of installing solar panels at home, from planning to powering up your solar system. Analyze Your Electricity Bill: Before diving into solar panel installation, it's crucial to understand your current energy consumption. Why trust EnergySage? Installing solar panels can dramatically reduce or eliminate your monthly electric bills while powering your home with clean, renewable energy.
[PDF Version]
-
Photovoltaic solar panel installation method diagram
Learn how to install solar panels with a complete step-by-step diagram. This diagram will serve as a blueprint for your project, helping you plan the placement of each panel and ensure an efficient and effective installation. Before Installation, take care of any obstructions to sunlight. Remove all unnecessary obstructions and items such as branches that. . A proper installation diagram serves as your blueprint, detailing exact panel positions, wiring routes, and mounting specifications that accommodate your roof's unique characteristics. Your solar panel layout must consider three critical factors: roof orientation to maximize sun exposure. . Solar panel diagrams are graphic representations of the connections you should make between each PV module and other components of the solar power system, including: Why Are They Important? Remember the saying, “Measure twice and cut once?” Detailed specifications with diagrams for reference help. . Are you considering installing solar panels at home to harness renewable energy and save on electricity bills? In this guide, we will take you through a detailed step-by-step process of installing solar panels at home, from planning to powering up your solar system. This guide unpacks wiring configurations, equipment, and safety, ensuring a successful solar setup for any. .
[PDF Version]
-

Photovoltaic panel installation cross arm spacing
Typically, the spacing between solar roof mounts ranges from 4 to 8 feet, with most installations being about 6 feet apart. . When designing a solar installation, one of the most important design factors is solar panel row spacing. Even small amounts of shading can reduce your array's output and lower system efficiency. For this purpose, the distances of the rows from each other are determined. . In the design of photovoltaic systems, the spacing between solar panels is crucial as it directly impacts the system's performance. Appropriate spacing between panels not only improves energy efficiency but. . If your system consists of two or more rows of PV panels, you must make sure that each row of panels does not shade the row behind it. Formula: Spacing = Height / tan (Solar Altitude).
[PDF Version]
-
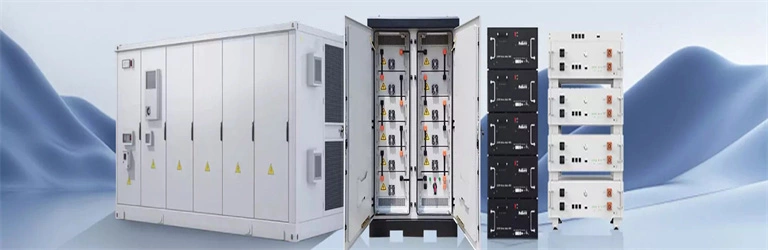
Solar photovoltaic panel line installation
In this article, you will explore everything about wiring solar panels, from understanding the basic components to connection types and the tools required, to a step-by-step wiring guide and final testing. Let's get into further details. What to Consider Before Wiring Your Solar. . Therefore, solar panel installation has become a hot subject. You also need to explain how each solar panel wiring configuration—series, parallel, or hybrid—affects performance, solar energy output, and inverter or battery compatibility. That's because the actual solar panel installation may. . Timeline Reality: The complete solar installation process typically takes 60-120 days from consultation to activation, with permitting being the longest phase (30-45 days) rather than the actual installation (1-3 days).
[PDF Version]
-

Photovoltaic panel installation process line drawing
Whether you are an experienced DIY enthusiast or a beginner, this step-by-step guide will provide you with a clear understanding of the solar panel installation process. Before you start, it is important to have a solar panel installation diagram that. . Creating a compliant pv system single-line diagram (SLD) is a critical skill for any electrician working in solar. Space requirements and layout for photovoltaic and solar water heating system components should be taken into account early in the design. . The Renewable Energy Ready Home (RERH) specifications were developed by the U. A free online tool to easily create, customize, and export professional solar power system diagrams. Drag and drop components, connect lines, and save your work. . A proper installation diagram serves as your blueprint, detailing exact panel positions, wiring routes, and mounting specifications that accommodate your roof's unique characteristics.
[PDF Version]
-
Is there any electricity in the photovoltaic panel connection line
PV wires carry the direct current (DC) generated by the solar panels to the inverter. The inverter then converts the DC into alternating current (AC), which can be used to power homes, businesses, or stored in batteries for later use. Always refer to the NEC code in effect or consult a licensed electrician for safety and accuracy. There are two basic approaches to connecting a grid-tied solar panel system, as shown in. . Grid-tied systems dominate 2025 residential solar: With 90% of installations being grid-tied, these systems offer the best ROI at $2. The two most common types are PV wires (photovoltaic wires) and grounding wires. The majority of solar panels and balance of system components use standardized connectors and cables, such as the Universal. .
[PDF Version]